Copyright © Kano 2022-2026
Setup, configuration and running Gekko miners with CGMiner
Release of cgminer v4.13.5 which adds the new CompacA2
v4.13.5 also of course still supports all the previous Gekko miners.
If you wish to build and run previous versions of cgminer on linux, see the steps below.
The sections below are:
Running CGMiner
linux:
./cgminer -o stratum+tcp://stratum.kano.is:3333 -u 1BURGERAXHH6Yi6LRybRJK7ybEm5m5HwTr -p x --suggest-diff 442
OR see below for:
./cgminer -c gekko.conf
windows:
cgminer.exe -o stratum+tcp://stratum.kano.is:3333 -u 1BURGERAXHH6Yi6LRybRJK7ybEm5m5HwTr -p x --suggest-diff 442
OR see below for:
cgminer.exe -c gekko.conf
OS X:
cgminer -o stratum+tcp://stratum.kano.is:3333 -u 1BURGERAXHH6Yi6LRybRJK7ybEm5m5HwTr -p x --suggest-diff 442
OR see below for:
cgminer -c gekko.conf
Of course in the above replace 1BURGERAXHH6Yi6LRybRJK7ybEm5m5HwTr with your own username.workername on the pool.
While the 1BURGER.. address works fine, your own username can't be a Bitcoin address.
If you wish to donate any hashrate (or Bitcoin) to sidehack, send it to 1BURGERAXHH6Yi6LRybRJK7ybEm5m5HwTr
To get cgminer to list the USB devices connected to your computer, the commands (on linux) are:
List known USB devices:
./cgminer -n
List all USB devices:
./cgminer --usb-list-all -n
The cgminer README has a whole section dealing with USB setup steps/problems:
https://github.com/kanoi/cgminer/blob/master/README#L609
Frequency/Voltage settings
The default settings for the CompacA2, R909 and CompacF are:
--gekko-compaca2-start-freq 300 --gekko-compaca2-freq 300 --gekko-compaca2-corev 270
--gekko-start-freq 400 --gekko-r909-freq 450
--gekko-start-freq 200 --gekko-compacf-freq 200
i.e. you'll get these if you don't specify any frequency settings at runtime.
The CompacA2 CoreV setting would, normally, not need to be higher than 270.
The best way to initially tune the CompacA2, if you wish to run it faster than default,
would be to run/stop it with your preferred settings to work out the limits:
1) Firstly step the fequency up by 25 each time until the hash rate stops
2) Next, step the corev up by 5 and redo the frequency steps
Don't put the corev up to more than about 270 and watch the temperature isn't getting too hot - i.e. around 70C.
If the new corev you are testing doesn't get better results than the previous,
or it gets too hot, step it back down, you've found your limit.
For all Gekko miners, --gekko-mine2 is now ignored.
All Gekko mining is now done using the mine2 version.
If you have a combination of CompacA2, CompacF and an R909, then setting frequency options would look like:
--gekko-compaca2-freq 300 --gekko-compacf-freq 400 --gekko-r909-freq 450
When selecting which miners to mine with, you can use any, or all of:
--gekko-compaca2-detect --gekko-compacf-detect --gekko-r909-detect
As before, specifying no detect options means use all Gekko miners available.
You can also select one or more miners to only mine with using their serial numbers e.g.:
--gekko-serial GS-10000001,GS-10000002
There's still the previous option e.g.
--gekko-tune2 60
that allows the miner to recover lost frequencies, if it was unable to match the frequency requested, due to the environment, but it later improves e.g. gets cooler. The '60' means check once per hour - default is don't do it. The miner may just end up stepping up and down once per check if it can't do better, so there's a lower limit of once per 30 minutes, range is 30-9999
Performance tuning features
Firstly, cgminer displays hash rates at the top and next to each miner.
The (avg) at the top is since cgminer started or was reset, so until a reset, it will include startup delays and frequency changes.
The 2 numbers next to each miner like '| 2.433T / 2.475Th/s ...' are the 5sec / running average.
To reset all the screen stats as at 'now', press the 3 keys 'd z enter' with a second delay between each.
You'd normally do this after the initial frequency ramp up or after any frequency changes,
then give cgminer a couple of hours to see the new average hash rates.
The new CompacA2 monitors the chip temperatures as it mines.
If it gets too high, it will stop the miner and wait for it to cool down.
It displays the temperature and per chip voltage e.g. '47C 270mV'
Important: all of the new tuning is done via the API, so you need to enable that when you run cgminer:
on the command line as shown below,
OR as per the example gekko.conf further down.
This of course works for the new CompacA2, the R909 and the CompacF.
Some of the tuning works with older Gekko miners also.
API Setup
The command line options to enable the API are:
--api-listen --api-allow "W:192.168.1.0/24,W:127.0.0.1"
and set 192.168.1.0 to match your local network. Put a zero on the end.
Note that if you run more than one cgminer on the same computer, each one needs a different API port.
The default, if you don't specify which port to use, is port 4028.
If you need to use a different port, you can add to the command line e.g.
--api-listen --api-allow "W:192.168.1.0/24,W:127.0.0.1" --api-port 4029
If you run two or more cgminers on the same computer, with the same port, the API will only work with the first one.
The first cgminer always starts with a message like:
API running in IP access mode on port 4028 (10)
The rest will also run, but give warning messages as follows:| | API bind to port 4028 failed - trying again in 30sec
API bind to port 4028 failed - trying again in 30sec
API bind to port 4028 failed - trying again in 30sec
API bind to port 4028 failed (Address already in use) - API will not be available |
To see the settings and performance numbers, from the cgminer source folder, issue the following command:
java API estats minerIP
Which of course also requires any version of java on your computer - as mentioned further down in the steps for each type of computer.
If you want to be able to run the 'java API' command from somewhere else,
the simplest solution is to copy the 'API.class' file from the cgminer folder to your folder where you run 'java API'.
In linux, you can also just download 'API.class' to your current folder by:
wget https://raw.githubusercontent.com/kanoi/cgminer/master/API.class
If you needed to change the port number from 4028 to another value e.g. 4029
java API estats minerIP 4029
If you run the command on the same computer that is running cgminer, then you don't need to specify your miner IP e.g.
java API estats
Without the numbers on the end is also exactly the same as typing:
java API estats 127.0.0.1 4028
See the API-README for other ways to access the API
https://github.com/kanoi/cgminer/blob/master/API-README#L485
API Usage
A new extra option for the CompacA2 is being able to adjust the Core Voltage
java API "ascset|0,corev,250" minerIP
The valid range is 0mV to 500mV, but keep it down to 270.
The CompacA2 also records in the API, the highest temperature and when it occurred.
To reset this via the API:
java API "ascset|0,zeromaxt" minerIP
For the R909 and CompacF:
There's a global wait factor override to adjust the rate that work is sent to the miner.
The default should be fine which is 0.5 for Linux, 0.4 for Windows and 0.3 for Mac
While this does also affect the CompacA2/1, it's unnecessary and you won't see the (n:m) value on the screen.
If you increase this (max 2.0), it sends work less often, so you'll get more overruns (Dups) the higher it goes.
If you decrease it, it will send work more often, however the R909 needs work very quickly, so the default is usually best to use.
If your hash rate is low and your computer has available CPU,
decreasing this may help increase hash rate but will also use more CPU.
You'll see the results of this in two places, on the screen the (4:2), the value 4 means work is sent every 4 to 5ms
and in the API output it's called [WaitFactor0] e.g.| | [STATS] => 0
[Serial] => GS-10008000
[WaitFactor0] => 0.500000
[WaitFactor] => 2.000000
[JobDataAge] => 0.001697
[Jobs] => 10081/12972/12980/12972/12980
[JobElapsed] => 46.61/59.99/60.00/59.99/60.00
[JobsPerSec] => 216.28/216.20/216.33/216.21/216.32
[JobsAvgms] => 4.62/4.63/4.62/4.63/4.62
[JobsMinMaxms] => 0.52:5.12/0.30:4.99/0.28:4.91/0.84:5.77/0.53:5.06 | That's showing the work rates for the last 5 minutes in the [Job... data.
If the work rates shown average higher than the (X:Y) X+1 shown, then making --gekko-wait-factor lower may help.
It also shows the serial number so you know for sure which miner you are dealing with.
There's an API adjustable setting for the required performance of the miner.
If - with the default setting - it falls below 65% of the expected hash rate,
it will reset the miner and adjust the frequency down.
You can change this setting, per miner, via the API
java API "ascset|0,require,0.65" minerIP
The valid range is 0.0 to 0.8 i.e. 0% to 80% and 0.0 means it won't ever reset due to this.
The API output [Require] and [RequireGH] show the setting and it's current GH/s value.
If you have more than one miner connected to cgminer, then you'll need to replace '0' (the zero) with the miner's asic number,
which is the [STATS] number in the 'estats' command output.
N.B. the [ID] number is not the API asic number, even though it is often the same.
Now for the fun stuff 🙂
You can lock the frequencies currently in use, so cgminer won't change them unless the chips stop responding.
java API "ascset|0,lockfreq" minerIP
If all the chips stop responding, it removes the lock and will do a reset and continue as normal, unlocked.
The lock status shows in the estats output as [FreqLocked]
This doesn't stop you changing any settings below.
To directly remove the lock
java API "ascset|0,unlockfreq" minerIP
You see the current chip frequencies and tuning data in the API estats output:| | [Chip0Nonces] => 73454
[Chip0Dups] => 0
[Chip0Ranges] => 244/753/746/765/758/727/3993/102.61%
[Chip0FreqSend] => 500.000000
[Chip0FreqReply] => 500.000000
[Chip1Nonces] => 67041
[Chip1Dups] => 8
[Chip1Ranges] => 221/716/675/688/745/705/3750/96.37%
[Chip1FreqSend] => 500.000000
[Chip1FreqReply] => 500.000000
.
.
[Chip5Nonces] => 74472
[Chip5Dups] => 0
[Chip5Ranges] => 239/727/731/754/785/721/3957/101.69%
[Chip5FreqSend] => 500.000000
[Chip5FreqReply] => 500.000000 | The 'Reply' is what the chip replied back after being sent the 'Send' frequency
You'll always see details about this on the screen when any frequency changes occur.
Nonces is the number found by the chip since mining started - it doesn't reset.
The Dups and Ranges can help you tune the performance of the chips.
Dups and Ranges reset to zero every time the miner resets.
Dups occur when the desktop CPU is unable to send work fast enough.
They are expected to occur occasionally.
Ranges shows the Nonces found in the last hour, in 10 minute brackets.
The 7th number in Ranges is the total.
The % number is the amount of work the chip has done, compared what is expected for it's frequency.
It starts at 0% and will rise towards 100% over the following 50-60 minutes.
It can vary by +/- 15% in normal mining.
To set the same frequency on all chips e.g. to 400MHz:
java API "ascset|0,freq,400" minerIP
Of course, if you change the frequency, and the frequencies aren't locked, the plateau code will come into effect trying to adjust the frequency.
As a special case, you can also set the frequency to zero.
This effectively stops mining and drops the power down.
Except for on the CompacA2, to set a specific chip to a specific frequency e.g. to set the first chip - chip 0 - to 410Mhz
java API "ascset|0,chip,0:410" minerIP
If you set one chip frequency to zero, it seems all chips automatically go to zero.
You may not be able to set the frequency range of chips very far apart and have them all working properly.
Try it and let me know how you go 🙂
I regularly set one chip 100Mhz below the others for testing.
You can change the target frequency for all the chips to 420MHz
java API "ascset|0,target,420" minerIP
You can adjust the waitfactor mentioned above, e.g. to 0.6, via the API
java API "ascset|0,waitfactor,0.6" minerIP
The range is 0.01 to 2.0
You can change the amount of time cgminer/USB waits to propagate the USB data it sends to the miner.
The default is 1000us. To set it to e.g. 800us
java API "ascset|0,usbprop,800" minerIP
The range is 200 to 1000
This may be useful on a computer that is able to do the USB I/O faster and you have a lot of miners.
If you make it too small, you could see trouble with the work not getting to the miner properly and the nonces not always coming back.
This is only avaliable with the R909 and CompacF, and adjusting it down increases CPU usage.
You can also do a miner reset at any time:
java API "ascset|0,reset" minerIP
R909 Voltage Adjustment
You can adjust the voltage by turning the blue knob with a small screwdriver:
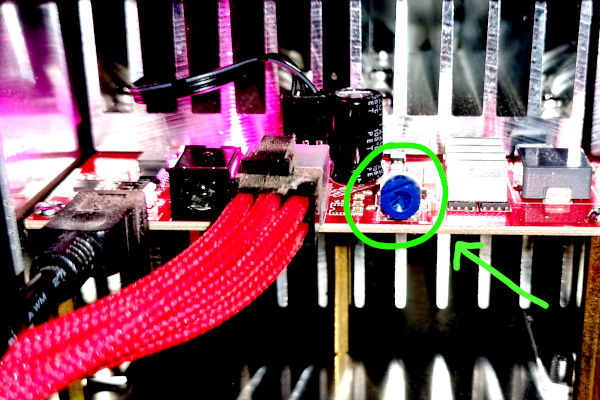
The stock voltage of 4.6V should be ok for most people.
A small screwdriver of either type should fit. Rotate it clockwise to increase the voltage.
It rotates almost a full 360° from minimum to maximum.
The voltage range is ~4.3V to ~5.0V i.e. about 1/3 of that per chip.
Don't try to turn it too hard, it stops at the minimum and maximum limit points.
You can adjust it while the miner is running.
If unexpectedly, it pulls too much power around maximum, the miner will kick off, and just require a full power cycle to recover.
Speed test results R909 and CompacF
Approximate performance table R909
In my testing with the latest code, I was able to get the following without issue.
However, this was also my early development miner, so you'll have to defer to sidehack for the expected production performance.
I'll add more rows and columns at a later date once people have them running.
| Watts | MHz | TH/s |
| | 450 | 1.60 |
| | 500 | 1.90 |
Performance table CompacF
The MHz and GH/s number are pretty accurate.
These are actual numbers from various miners.
Low frequencies tend to perform worse than expected. These are ferraris people - put some power into them 🙂
| Amps | MHz | GH/s |
| 1.95 | 400 | 260 |
| 2.2 | 450 | 292.5 |
| 2.4 | 500 | 325 |
| 2.66 | 550 | 357.5 |
CGMiner Git
The master git for cgminer is https://github.com/kanoi/cgminer
CGMiner README https://github.com/kanoi/cgminer/blob/master/README
Building on linux/ubuntu
If you already have my previous version for the CompacF
The update steps are:| | sudo apt-get update
sudo apt-get upgrade -y
cd
cd cgminer
git pull
CFLAGS="-O2 -march=native -fcommon" ./autogen.sh --enable-gekko --enable-icarus
make clean
make
sudo apt-get install -y openjdk-8-jre-headless |
If you don't already have my previous version:| | sudo apt-get update
sudo apt-get upgrade -y
sudo apt-get install -y build-essential autoconf automake libtool pkg-config libcurl4-openssl-dev libudev-dev libusb-1.0-0-dev libncurses5-dev zlib1g-dev git
cd
git clone https://github.com/kanoi/cgminer.git
cd cgminer
CFLAGS="-O2 -march=native -fcommon" ./autogen.sh --enable-gekko --enable-icarus
make
sudo apt-get install -y openjdk-8-jre-headless |
On linux, if you want to just be able to type 'cgminer' instead of './cgminer' when you are in the code folder,
then installing it in /usr/local/bin/ will allow that.
The command, after building it per the above steps, is:| | sudo make install | N.B. see below Remove pre-installed hack linux
about removing any other cgminer that may have been installed on your computer.
If only you installed it previously, then ignore the 'Remove' information.
If you wish to keep a log of each run in linux, add the following on the end of the command:| | 2> "run-`date +%Y%m%d%H%M%S`.log"
e.g.
./cgminer -c gekko.conf 2> "run-`date +%Y%m%d%H%M%S`.log" |
OR an example shell script to run cgminer, call it cgminer.sh| | #!/bin/sh
#
while true ; do
now="`date +%Y%m%d%H%M%S`"
#
./cgminer -c gekko.conf "$@" 2> "run.$now.log"
#
echo "Sleeping for 5 seconds ..."
sleep 5
done |
For those not expert at linux, remember to chmod +x cgminer.sh
The "$@" means you can pass extra parameters to the shell script to be added onto running cgminer e.g.
./cgminer.sh --gekko-noboost
to turn off asicboost
After you quit cgminer with the 'q' key, if you want to stop the script restarting,
type Ctrl-C during the 5 second sleep.
CGMiner Windows 10 32bit binary
A v4.13.5 binary for Windows can be downloaded at: https://kano.is/cgminer.php
Check there for the current and previous versions available.
For the API, to install Java on a windows computer, visit https://java.com/
The instructions to compile cgminer yourself on Windows 10 are here:
https://github.com/kanoi/cgminer/blob/master/windows-build.txt
As with all USB miners on Windows, you must install Zadig and setup the miner.
This is documented in the CGMiner README
https://github.com/kanoi/cgminer/blob/master/README#L611
In a windows bat file, you can say 2> to save a log of the cgminer run as well as see it on the screen.
Example bat file below using -c gekko.conf described further down,
with a loop to sleep for 5 seconds and then restart (if cgminer exits)
The log files are date stamped, so if you get in a fast loop of start/stop/start/stop... it will create a lot of them 😛| | @echo off
REM cgminer
:Loop
Set NOW=%date:~10,4%%date:~7,2%%date:~4,2%.%time:~0,2%%time:~3,2%%time:~6,2%
cgminer -c gekko.conf 2> "run.%NOW%.log"
echo Sleeping for 5 seconds
ping -n 5 127.0.0.1 > NUL
GOTO Loop | Just removing the last line will stop it from auto-restarting cgminer when it exits
CGMiner MacOS
The instructions to build it on MacOS - tested on Big Sur and later versions, on M1 and Intel - are:
https://github.com/kanoi/cgminer/blob/master/mac-build.txt
That also includes help with the API on the Mac
If you wish to keep a log of each run on the Mac, add the following on the end of the command:| | 2> "run-`date +%Y%m%d%H%M%S`.log"
e.g.
cgminer -c gekko.conf 2> "run-`date +%Y%m%d%H%M%S`.log" |
OR an example shell script to run cgminer, call it cgminer.sh| | #!/bin/sh
#
while true ; do
now="`date +%Y%m%d%H%M%S`"
#
cgminer -c gekko.conf "$@" 2> "run.$now.log"
#
echo "Sleeping for 5 seconds ..."
sleep 5
done |
For those not expert at the terminal, remember to chmod +x cgminer.sh
The "$@" means you can pass extra parameters to the shell script to be added onto running cgminer e.g.
./cgminer.sh --gekko-noboost
to turn off asicboost
After you quit cgminer with the 'q' key, if you want to stop the script restarting,
type Ctrl-C during the 5 second sleep.
CGMiner gekko.conf configuration file
An example gekko.conf configuration file:| | {
"pools" : [
{
"url" : "stratum+tcp://stratum.kano.is:3333",
"user" : "username.gekko",
"pass" : "x"
}
],
"gekko-compaca2-start-freq" : "300",
"gekko-compaca2-freq" : "300",
"gekko-compaca2-corev" : "250",
"gekko-compaca2-detect" : true,
"gekko-r909-freq" : "450",
"gekko-r909-detect" : true,
"gekko-compacf-freq" : "400",
"gekko-compacf-detect" : true,
"gekko-tune2" : "60",
"suggest-diff" : "442",
"failover-only" : true,
"api-listen" : true,
"api-port" : "4028",
"api-allow" : "W:192.168.1.0/24,W:127.0.0.1"
} | Set "username.gekko" to match your username.gekko
and set 192.168.1.0 to match your local network. Put a zero on the end.
Change the port number 4028 above, if you need to change the API port as mentioned here.
So you run cgminer with just: -c gekko.conf
Your miner stats on a web page
Included in the cgminer folder is a file: miner.php
If you have a linux computer or even an RPi running linux,
and you have enabled the API in cgminer as mentioned above,
you can easily setup a web page to view your miner status using miner.php
With ubuntu linux, the commands to install a web server and php are:| | sudo apt install apache2 php |
Then copy miner.php to the web server.
Either:| | wget https://raw.githubusercontent.com/kanoi/cgminer/master/miner.php
sudo cp -v miner.php /var/www/html/ | Or:| | cd
cd cgminer
git pull
sudo cp -v miner.php /var/www/html/ | The git pull is necessary to get the latest miner.php as at 2024-May
Then you need a configuration file /var/www/html/myminer.php
with your miner information and some settings:| | <?php
$rigs = array('192.168.0.10:4028:Rig1');
$readonly = true;
$allowgen = true;
$rigbuttons = false;
$rigipsecurity = false;
$customsummarypages = array('Gekko' => 1, 'GekkoChips' => 1);
?> | Set the IP address 192.168.0.10 to match your miner.
You can replace 'Rig1' with whatever name you wish to call your miner.
Don't forget to change port 4028 if you changed it in your cgminer settings.
If you have more than one miner, the $rigs line would look something like:| | $rigs = array('192.168.0.10:4028:Rig1', '192.168.0.11:4028:Rig2'); |
Then view the web page on the linux computer like: http://192.168.0.X/miner.php
Where 192.168.0.X is the IP address of the computer you installed apache2 on.
See the cgminer API-README for details about the settings above,
the many other settings available in miner.php,
and about how to setup a web server on other platforms.
https://github.com/kanoi/cgminer/blob/master/API-README#L982
Troubleshooting R909
If you are having performance issues after restarting cgminer,
stop the miner, disconnect the USB lead and let it cool for 5 minutes (the fan will keep running)
Troubleshooting CompacF
If you have one or more CompacF USB miners and get another one that "doesn't work" then there's some very simple but also very specific testing you can do to see if there is a problem with the "new" miner that "doesn't work", or determine if it is your setup that is the problem:
1) Power
Power is the biggest issue, since these things can use more power than most typical USB ports will supply.
Often even the USB port will work for a while then start to fail, or not provide enough power later after working at the start.
2) Performance
If you are able to supply enough power, performance settings can also be a problem.
Some chips don't like low performance and may want to start at a higher level.
Also if you are using windows, or a slow linux gadget, the USB performance may be an issue if you have multiple miners.
Also use USB2 connections and cables.
So the specific steps to test a miner are:
a) If you are using some version of cgminer not from me, then throw it away and get the version only from the links above.
b) Stop cgminer, and unplug all the miners in your hub, except one you know works, and then fire up cgminer as usual and see that it works.
Of course it should, but do it anyway.
c) Now, stop cgminer, unplug that working miner, and put in the exact same spot, the miner that "doesn't work" then fire up cgminer as usual.
If it does work mining ok, then maybe you don't have enough power, or the hub you got isn't designed for a Ferrari and can't supply enough power for extra miners.
Or if it's a Gekko hub, you may have been using the low power port, or have too many miners in the one hub.
The other possibility is too many miners for whatever computer you are using to mine them (i.e. windows or a slow linux gadget)
I guess it could also be USB3 related, but I avoid USB3 as much as possible by using USB2 cables and connections.
If it doesn't work mining ok, then there's also:
start it mining at a higher frequency than the default and of course set it to run higher than the default:
--gekko-start-freq 300 --gekko-compacf-freq 400
make sure you have a fan on it.
Extra steps to build previous versions:
On Linux, if you have already built the new version,
the git commands to switch to the previous v4.12.3 version are:| |
cd
cd cgminer
git checkout 6d2cebbff4
CFLAGS="-O2 -march=native -fcommon" ./autogen.sh --enable-gekko --enable-icarus
make clean
make | The 'CFLAGS' line is to make sure it says it's v4.12.3
the git commands to switch to the earlier v4.12.1 version are:| |
cd
cd cgminer
git checkout 8634744557
CFLAGS="-O2 -march=native -fcommon" ./autogen.sh --enable-gekko --enable-icarus
make clean
make | Again, the 'CFLAGS' line is to make sure it says it's v4.12.1
WARNING
Avoid https://github.com/wareck/cgminer-gekko
They removed all the git code ownership information, included a major security risk (extranonce),
the code has the solo mining bug that can send your coins to a random address,
and they have done other various altcoin code changes, and released a windows binary with who knows what changes in it.
Avoid https://github.com/W1T3H4T/cgminer-Raspi/
It uses the wareck git, not a copy of my git, includes hidden patches,
and auto downloads via a link to binaries of unknown origin.
Remove pre-installed hack linux
Some people have been getting linux RPi's with out of date and modified cgminer code.
As mentioned here: https://bitcointalk.org/index.php?topic=5355470.msg60443937#msg60443937
You may need to do the following to get rid of the other versions before installing the official version on your linux RPi:
Quote:| | So to find and get rid of that, type the following:
cd /home ; which cgminer
So for example if this replied with "/usr/local/bin/cgminer" then you would type:
sudo rm -v /usr/local/bin/cgminer
After deleting it with 'rm' do the 'which' command again to see there are no others.
Then if you install cgminer yourself it usually ends up in "/usr/local/bin/cgminer"
So while installing cgminer yourself may resolve this, the extra commands make sure to remove any 'other' cgminer in your path first. |
Copyright © Kano 2022-2026
| |